Showing posts with label Spellbinders. Show all posts

Sunday, March 22, 2020

So Grateful Tea Bag Fold Card

Card project designed by Sharon M. Reinhart March 2020
Hi all, stopping by with another project using the same papers as my last post but creating a total different card! This card uses a tea bag folding technique to create the focal point. Tea bag folding is a fun technique which requires only a few supplies. Once you master a basic fold there are many
progressions that may be completed to change the design. This particular fold begins as a basic circle fold whereby you start with a die-cut or punched circle (when first learning begin with a larger circle and then progress to smaller circles.) A text weight/lightweight paper is the best to use.

Fold your circle shape in half and then in half again so that it is folded into quarters, creasing well with a bone folder. Unfold and crease again on both lines creating two mountain folds. Hold the circle shape so that the folds are in an X shape, press in on sides to collapse down into a triangle with the folded point at the top and the curved open end at bottom. You have now completed the basic circle fold and could assemble into a medallion at this point but we are going to add a simple progression. Fold back the first layer onto itself, at the open end. There that’s all there is to it, now complete 7 more folded circle pieces.
To assemble, place sookwang tape (scor-tape, be creative tape) along the folded edge on one side on the back of the shape. Remove the tape liner, sandwich between the top and bottom layer of another folded shape, continue until 8 folded shapes have been secured. You now have a floral shape or medallion. Insert a brad through the Center or simply an adhesive rhinestone.

The rest of this card is pretty simple, begin with an A2 white card base, layer a solid colour panel which is 1/4-inch smaller followed by a printed panel -Lawn Fawn, which is again 1/4-inch smaller than previous. Die-cut a fancy circle, Spellbinders, or doily shape or simply use an actual doily. Adhere this to the upper portion of the card. Next adhere the folded tea-bag medallion to the Center of this. Adhere a strip of solid colour card-stock along the lower portion of card, add a sentiment, simple strips by Taylored Expressions has been used here, and voila you are done.

I chose the sentiment “So Grateful For You” as I was thinking about the many people that are out in the front lines battling this virus for all of us, from health care workers to truckers and grocery
workers and everybody in between. I am so very grateful! I encourage each of you to make a card with the sentiments of thanks, appreciation and gratefulness and although we can’t get it into the hands of every person on the frontlines, we could post through social media or display on our windows at home and start a different trend - a grateful trend!
Creatively Yours,
Sharon

Wednesday, November 6, 2019

Holiday Vignettes

Projects designed by Sharon M. Reinhart
Stopping by with a couple more projects showcased at the Scrapbook Carnival. These projects have been made using the grand snow globe and the grand cabinet die templates from Spellbinders.  Both of these die sets are extremely versatile. A few add on templates have been used, for the project on the left the poinsettia die has been used and the project on the right also makes use of some snowflake dies as well as the petite double bow. Hope you have been inspired to create!
Creatively yours,
Sharon

Monday, July 3, 2017

Fun with Easel Cards!

Projects designed by Sharon M. Reinhart as seen
 in the July 3, 2017 CardMaker Update
Inviting you to take a look at my most recent CardMaker Update which went live today July 3, 2017. It's all about creating Easel cards! I hope you will stop by CardMaker Magazine www.cardmakermagazine.com  to see full photos, instructions and other creative tidbits! In case you haven't signed up for this free resource, which comes out every three weeks sign up while you are there and then after that its easy, it will come directly to your inbox! If you have missed a few issues there are a few archived and can be accessed by clicking the Updates tab.
Creatively Yours,
Sharon

Monday, April 27, 2015

Making Flowers with Die Templates!

As seen in CardMaker Magazine online newsletter
Projects designed by Sharon M. Reinhart
Just wanted to let you know that my most recent CardMaker newsletter is available now and it is all about making flowers using die templates! With Mother's Day approaching there is also some inspiration for your cards in order to celebrate Mom! Head on over to CardMaker Magazine newsletter for the complete article and full pictures!

Saturday, May 10, 2014

Mother's Day Card!

Project design by Sharon M. Reinhart
I am sure you can tell that I love this Primrose paper line from Bo Bunny! With Mom's Day just around the corner I wanted to share this card created with Bo Bunny Papers, Spellbinder's Cut, Fold and Tuck dies as well as Shapeabilities, a leaf die from Sizzix and one of my favorite tea-bag folding techniques.
I truly hope you like it! Happy Mother's Day to all the wonderful Moms out there. Make sure to share some special time with yours!
Mothers hold their children's hands for awhile
 ... their hearts forever!
Forever in our hearts!
♥Sharon


Monday, February 3, 2014

Mini Valentine's!

Project design ©Sharon M. Reinhart 2014
I love making mini Valentine's! They are the perfect little greeting to tuck into pockets, suitcases, lunch or gift bags, briefcases and many other items. These ones are just 2.5 inches square. To create these little darlings just grab some of your double-sided paper scraps. The little hearts were created with that beautiful plastic backed velveteen ribbon that was out at Christmas and then I purchased it when it was 80 percent off (thinking ahead). It die-cuts quite nicely and used in the Stampin' Up embosslits heart die it even came out embossed! The flower is a handmade embellishment using air dry clay and the scallop border shown on the card at the left is simply the top rounded portion cut off some of the straight edge die-cut hearts. The die templates for the larger straight and scallop edge hearts are from Spellbinders. This paper is from Bo Bunny's Double Dots collection - very versatile! Now if mini is not what you had in mind, simply re-create these designs in a larger A2 card scale. As you can see love is in the air around here. Remember for a larger view just click on the photo. Hope your are inspired to create!
Creatively Yours,
Sharon


Tuesday, January 14, 2014

Back from CHA!

 
Well I am back in two different ways - back to my blog and back from the Craft and Hobby Association Mega show held in Anaheim, California. As usual this show is a feast for the eyes! The displays are just so absolutely creative! To the talented individuals who work endless hours on creating this feast - a huge thanks! Your work is truly appreciated!
I had a whirlwind trip, it was a shortened version this year so I felt a bit like a little ball inside of a pinball machine - going here there and everywhere. Due to this I did not get as many photos as I had hoped to. But my eyes did see many wonderful things! I had the opportunity to attend an event at the Spellbinders booth and WOW! I had heard about the total transformation of their booth and it truly was spectacular! I was introduced to a new Spellbinder's tool - the Tool 'n One which I am sure that anyone who die-cuts intricate designs is going to absolutely love! I will endeavour to share with you in my next few posts some of what I experienced at CHA.

As Valentine's Day is approaching I thought I would share my mini press kit that I use while at CHA in order to distribute my bio and contact info while at the show. It would also make a cute Valentine's and instead of inserting a bio and business card inside (which I have in my press kit) insert a gift card and greeting! The base is created using an Accu Cut gift card holder die - I simply go to my local scrapbook store to die-cut my bases. Then I used a Spellbinders scallop heart paired with beautiful metallic thread from Wonderfil threads and created a Spirelli wrap. Finish with a little cardstock banner and to get just the right color of rhinestones I colored clear ones with a Bic Mark It pen. Hope you like it! Stay tuned, on Monday January 20th I will share a link with you for a few other fun Valentine's in my next CardMaker Magazine newsletter!
Creatively Yours,
Sharon


Saturday, October 5, 2013

World Card Making Day!

Project design by Sharon M. Reinhart 2013
Well I hope it's a wonderful day for each of you, full of inspiration and creativity! In honor of this special day I thought I would share this elegant but simple card and the instructions with you. What makes this card so simple is that it makes use of both sides of this beautiful printed paper from Kaisercraft -- Rapture. One side has these great 3 x 3-7/8 inch panels and the other is a beautiful floral print. I chose the Cherish panel for this card. Below are the instructions.
1. Form 4-1/4 x 5-1/2 inch side fold card from Bazzill cardstock.
2. Layer 4 x 5-1/4 inch panel of floral print cardstock.
3. Die-cut ivory pearl cardstock using Spellbinders Fleur de Lis rectangles die template (4 x 4-3/4 inch). Layer to card front.
4. Trim out Cherish panel and layer onto green cardstock leaving a slight margin. Layer this panel to card front using foam mounting squares.
5. Color heart rhinestone and four small rhinestones using Bic Mark-It pen (Tranquil Teal).
6. Adhere small rhinestones to four corners on die-cut panel.
7. Die-cut ivory heart using Stampin' Up Embosslits hearts die, adhere to top of Cherish panel followed by heart rhinestone.
8. Punch three hearts from green cardstock using Fiskars hand punch, adhere hearts to bottom of Cherish panel. *
9. Tie cream sheer ribbon in a bow and adhere to center bottom of panel on card front.
10. Decorate card inside as desired.
* Tip - apply 1/2-inch score tape to piece of green cardstock then punch hearts. Use a straight pin to assist in the removal of the tape liner and then with the straight pin still attached to the punched heart use the pin as a tool to place the heart on project. I like to keep a corsage style pin on hand for this.
That's it! Hope you enjoy it and are inspired to create!
Creatively Yours,
Sharon

Monday, September 23, 2013

Spackle on Cards!

I had a great time teaching a wonderful group of ladies on Saturday at a card workshop hosted by a dear friend --thanks Jennifer! Two of the cards were Christmas theme and the third was this card created with, drum roll, spackle for walls and drywall tape. So hit the hardware store for some of these supplies. The other supplies used were a beautiful leaf stencil by Dyan Reaveley,the Daisy Flower topper die from Spellbinders Paper Arts, leaf set die by Elizabeth Craft Designs, green acrylic craft paint and a stamp from the Michaels bins. This flower was inspired by Becca Feeken's Anemone frilly flower on her Amazing Paper Grace blog, she is quite the talented lady!! Thanks for the inspiration Becca!! The difference here is that I used the Daisy topper and cut off the inner petal of the die-cut piece leaving the center in tact and layered them slightly offset. Then the petals were curled and accented with acrylic paint. For the leaf and the flower center simply apply drywall tape to cardstock then either punch or die-cut. Hope you like it!
Creatively Yours,
Sharon

Sunday, September 22, 2013

Spellbinders at the Emmys!!

Just wanted to put a shout out to the Spellbinders Paper Arts team - they will be at the Emmy Awards Connected Gift Lounge with the Craft and Hobby Association on September 22nd! Way to go!! I am so happy for your accomplishments! I encourage you to visit Spellbinders blog for info on a party and prizes using this link Spellbinders. Love their products and use them all the time, the card below as seen in my most recent CardMaker online newsletter was created using one of their cut, fold, tuck, Shapeabilitie dies. Cheers to all of you at Spellbinders -- Enjoy, you deserve it!!
Card design by Sharon M. Reinhart
Creatively Yours,
Sharon

Monday, September 16, 2013

Cut & Fold Techniques!

Cards designed by Sharon M. Reinhart
Hello All! My most recent CardMaker newsletter was released today and I would love to invite you to take a look. This is a free resource, all you have to do is sign up at CardMaker Magazine and every three weeks a new issue will come directly to your inbox. Kimber McGray and myself are the editors, so one issue will be written by Kimber and the next one by yours truly. This one is all about cut and fold techniques, so head on over using this link CardMaker Magazine.
Hope you like it!
Creatively Yours,
Sharon

Monday, September 2, 2013

Butterfly Wishes Card!


Firstly, I just want to thank my reader's for hanging in there with me, I know my posts have been few and far between. I am trying to regain my inspiration through a very difficult time. Hang in there with me - it is coming I promise.
For today's post I would like to challenge you to pull out those bits and pieces leftover from previous projects and create a card using them. It's actually kind of fun and is a good little nudge if you are looking for inspiration.
This card is simple but sweet, the butterflies (leftover pieces) are created using a Stampin Up die, a few little gems, the cardstock had pre-embossed dots on it, so no work or supplies needed there. The printed cardstock was a small leftover piece, I think it was Basic Grey probably discontinued. But that doesn't matter as the challenge is for you to use YOUR scraps, using this design somewhat like you would use a card sketch. The decorative square (Spellbinders) was from a previous project and the dotted square was the leftover piece from cutting a frame. A little sentiment from the Stampin Up Petite Pairs set (love this set) along with olive pastel chalk ink and you are good to go! If you are looking for a Stampin Up representative drop me a line I have a friend who is an absolute gem that I would love to connect you with! Hope you are inspired to create today!
Creatively yours,
Sharon

Wednesday, May 23, 2012

Gratitude Card


I must apologize, I just realized that a recent post, (which has now been deleted) was a card I already shared with you. So to make up for it here is a card created with heat embossing, vellum and tombow markers.  the floral stamp is from Hero Arts and the lovely layers of course are created with Spellbinders TM dies. It was part of the trio for my April 30 issue of the CardMaker online newsletter. Just a quick post today -- life is spinning fast.
Creatively yours,
Sharon

Tuesday, March 6, 2012

Delicate Layers & Tea Bag Fold Card

I think the amount of snow we received the past couple days was the inspiration for this card. The snow glistens as if it has been dusted by glitter thus the glitter on this piece. The layers are like the layers of snow we now have and the finished piece could resemble a snowflake as well. This card is created by using the Fleur De Lis  Pendant die by SpellbindersTM, however any pendant die would work. Then the final part is a tea-bag fold creation in the center followed by a pretty pink brad. A couple of sparkling rhinestones can also be found here and there. To build the layers just use a dimensional tape in between, I do like to use the foam mounting tape or squares by 3M. The tea-bag folded rosette was created using a basic fold with circle shapes and then progressing on with a final fold back of the top layer. The basic fold is to fold the circle in half and then again into quarters. Unfold all, re-crease on both lines so very pliable. Holding the circle with the folds in an x shape, push center pieces under and into center to collapse into a pie shape. Fold back top layer aligning with edges (refer to photo).  You need 8 pieces to create one rosette. Then assemble by placing a small piece of tape on the back on one side (stay consistent to the same side), sandwiching one piece between the other. My favorite tape to use for this is the 1/8" wide Scor-tape. For more tea-bag folding projects and instructions please check out my book Tea Bag Folding Through the Seasons.
Creatively Yours,
Sharon

Thursday, March 1, 2012

Paper Flower Favor


Project Design ©Sharon M. Reinhart 2012
A quick post today to share one of my most favorite dies. It's the Spellbinders TM  Shapeabilities® Anemone die set! This project was originally for Valentine's  Day but it would also make a wonderful wedding or shower favor. It started with a silver tin that was dry brushed with white acrylic paint. Then two layers of the same size Anemone die followed by the petal style die (in the same set) and then the final layer a stamped letter. Be sure to curl the flower petals gently using a bone folder or wooden skewer. Hope you like it!
Creatively Yours,
Sharon

Wednesday, January 11, 2012

Valentine's Inspiration!

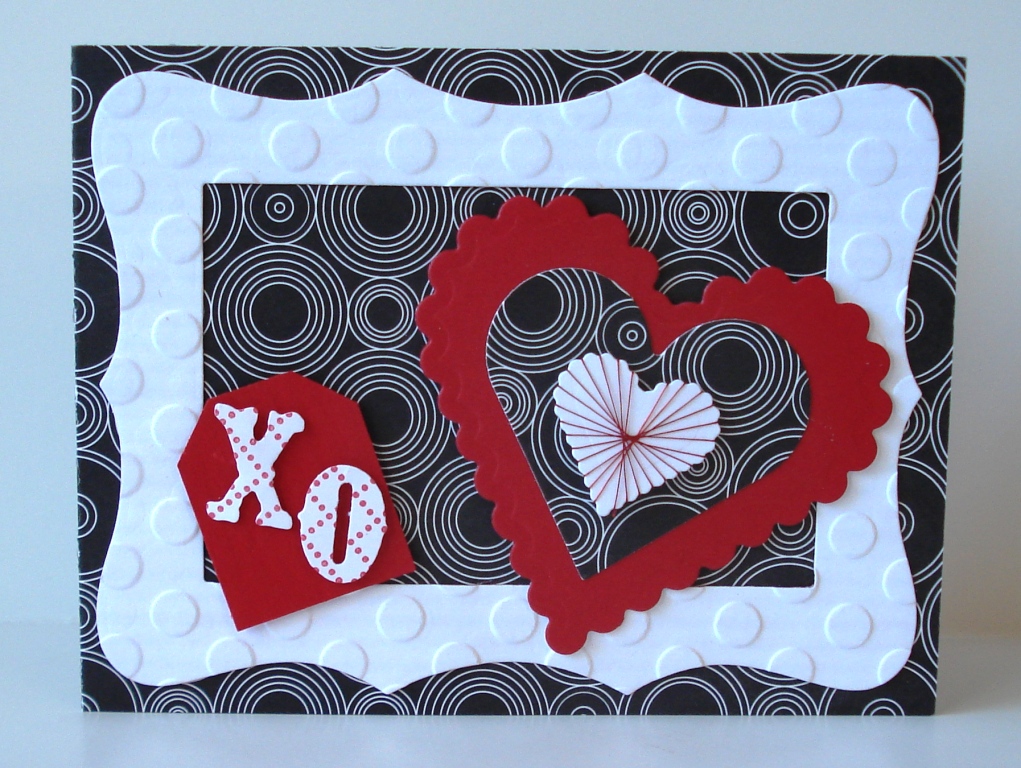
Well we are just a bit over a month from Valentine's day, before you know it the day will have come and gone. So, now is the time to create your Valentine's. This particular card would be perfect for the guys or the gals, because of the colors and the different patterns it retains a strong look. I am sure the guys will not mind the little bit of beautiful metallic thread that adorns the smallest heart. I think the thread gives this card a bit of a pop. Try stamping a pattern onto the die cut letters (Tim Holtz Vintage Market die) it helps to make the x and the o pop as well. I love all of the different patterns in this card.  The die cut hearts and frame are from Spellbinder's. I wanted a larger polka dot on the frame so I embossed it in an embossing folder. Hope this card inspires you to start creating!
Creatively Yours,
Sharon
Blog Hop Button January Blog Hop: Love is In the Air + Giveaway!

Saturday, October 8, 2011

Quick Any Occasion Card


Card Design © Sharon M. Reinhart 2011
This simple card is an example of using what you have on hand. If you do not have co-ordinating brads - make your own. Simply apply a strong double sided liner tape to the brad and trim excess. Place a square of printed card stock onto exposed adhesive (it's good to start with a slightly larger square), trim excess cardstock. To give the designer brad an epoxy or lacquer effect apply Glossy Accents or similar clear dimensional medium and let dry. The die cut leaves (Sizzix die) have a thin coat of the dimensional medium as well. The decorative mat is created using a Spellbinder's die. Now you can co-ordinate your brads to any card! The space at the bottom right corner would be perfect for a small greeting like the words thanks, thankful or grateful. On that note, as this weekend is the Canadian Thanksgiving I would like to extend my best wishes to all of you celebrating Thanksgiving, may you share some warm and wonderful moments with family and friends. I know I will be counting my blessings I hope you will too! Be sure to watch for my next post where this design will be transformed into a Christmas Card! 
Creatively Yours,
Sharon

Monday, August 15, 2011

From Card to Home Decor!

Design ©Sharon M. Reinhart 2011
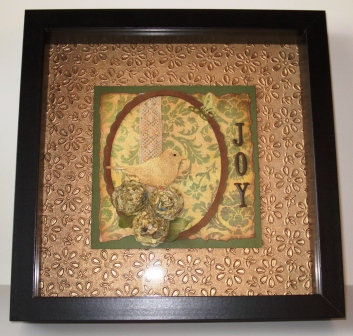
Two areas of paper crafting that I really enjoy are cardmaking and home decor projects. Well for this project I made use of a card that I had created for a recent CardMaker newsletter article -- From Trash to Treasured Cards, not only were the flowers created using an old phone book, Spellbinders scallop dies and inks, but now I have also repurposed the card into a home decor piece. I layered the card onto beautiful embossed daisy paper and then placed the project into an Ikea frame. So, go take a look at your collection of cards, maybe some of them would make a perfect home decor piece. Time and time again I look at wall decor pieces in the store and say "I can make that" and I never take the time out to do it, so this was a step in the right direction. There is hope for me yet!  Enjoy!
Creatively yours,
Sharon
Blog Hop Button Finished on the 15th: FaveCrafts Blog Hop for August