Showing posts with label thread wrapping. Show all posts

Thursday, February 7, 2019

Heartstrings Valentine!

Card project designed by Sharon M. Reinhart February 2019
Hi everyone! Stopping by with a simple yet striking Valentine card suitable for either a guy or gal!

This card is made with a side-fold A2 size (begin with 8-1/2 x 5-1/2 inches and score and fold in half) white shimmer cardstock base. A 2-inch x 5-1/2 inch piece of "love" cardstock from Canvas Corp has been layered onto two red scalloped strips at each side. The beautiful scalloped edge has been created with a Lawn Fawn die set called Stitched Scalloped Borders. An alternative would be any scalloped border die or punch, punched circles layered on top of each other or scalloped-edge scissors.

The next layer is created with 3 thread wrapped cardstock hearts. These particular hearts have been die-cut using a Spellbinders Scalloped-edge Nestablilities die template. The thread is a beautiful cream/gold thread from Wonderfil. I find it best to work from the spool while completing thread wrapped pieces. First tape the end of the thread to the back of the heart shape close to the top. My first wrap begins through the first valley to the right of center on the top of the heart and continues along through the first valley to the left at the bottom of the heart. Continue wrapping in an anti-clockwise manner until complete, trimming thread from spool and adhering to the back with tape.

The center heart has been adhered with foam mounting tape allowing further dimension and the top and bottom hearts are adhered with double sided tape. A gold heart, punched using a Fiskars punch adorns the center heart followed by three mini adhesive black rhinestones.

The finish on this card is a die-cut heart from the printed paper using a die from Penny Black that has 5 decorative hearts and 1 plain heart in the set and is called All My Hearts #51-180. Layered on top of this is a gold die-cut word "LOVE" which has been created with a Sizzix set by Stephanie Barnard #560025.

I like to add a bit of the décor to the inside of the card, so I just simply added a strip of red cardstock followed by a stamped greeting punched out with a circle punch. There are so many ways of carrying the design from the front to the inside, just add some of the same colors or images that have been used on the front. It is amazing how just a strip of cardstock and a little element such as a punched heart or greeting finishes the inside! Hope you like this card and are inspired to create!
Creatively Yours,
Sharon

Friday, April 8, 2016

Project designs ©Sharon M. Reinhart
Spring has Sprung Card Class!
at the Crop for Critters on Saturday April 23, 2016 at the Highwood Community Centre 10 Harlow Avenue NW, class consists of the three cards shown, fee is $20.00 per person with twenty percent from each class fee going back to the crop fundraising efforts. The class will start at 1 pm and we should finish up around 2:30 or 3 pm. Techniques include peel-off sticker techniques, coloring on vellum, die-cutting, and a quilt thread wrap.
This class is open to all, even if you are not registered for the crop you can still sign up and take the class.

Participants must bring, scissors, paper trimmer, adhesive for card assembly and liner tape such as the 1/8 inch scor-tape is also recommended along with dimensional adhesive such as foam mounting tape and adhesive dots. A piercing tool and mat will be used however if you do not have one I will have a couple tools that may be shared as a group.
Class size is limited and participants must be pre-registered by midnight April 21, 2016 by contacting myself Sharon Reinhart directly through this page or at sharonmreinhart@yahoo.ca
Hope you will join us!!

Friday, January 29, 2016

Card Class Photo Inspiration!

Project designs ©Sharon M. Reinhart September 2015
Here they are! The four projects that we will be working on in our February 13, 2016 class being held at the Thorncliffe Greenview Community Center. The techniques are using Washi tape, thread wrapping, die-cutting, pressure embossing and two different peel off sticker techniques one using tombow markers on vellum. The tag may be created as is, perfect for adhering to a gift bag or a bottle of wine, flavored oils or a box of yummy chocolates, or if desired it can be made into a card. The LOVE card as shown can also be made instead as a Christmas card using an ornament shape and the word MERRY. The class will be held from 1:30 to 4:00 pm. Registration and payment of $25.00 per person is required in advance before February 6th. Please leave me a message if you have any questions or wish to register for this class.
Creatively Yours,
Sharon

Tuesday, January 22, 2013

Join us for some creative fun!

Just wanted to pass this on for anyone in the Calgary area. You may register for the crop, the classes or everything! Join Sharon M. Reinhart (Author & Designer) for a variety of mini classes in Calgary at a Scrapbooking Crop hosted by Joanne Liddy-McTavish. Saturday January 26, 2013 10 am to 10 pm, Woodcliff United Church 5010 Spruce Drive SW. Contact Joanne to register for the crop at jliddymct@shaw.ca Mini Classes being offered by Sharon at the crop:
Share a Little Love: 10:30 am to 11:30 am, create two cards perfect for the love’s in your life using thread wrapping, pressure embossing and tea bag folding techniques. Perfect for Valentine’s, Anniversary or simply just because!
Mixed Media Cards: 11:45 am to 12:45 pm, create two A2 cards, one card makes use of pressure embossing and acrylic paint and the 2nd card has you creating a background using a variety of readily available objects and acrylic paint, accented with rubber stamping and pressure embossing.
Joy Canvas: 1:00 pm to 2:30 pm, create some joy with this 5-inch mini canvas project and learn how to make beautiful recycled flowers from something we all have access to. Card classes are $10.00 per class & the mini canvas class is $18.00, payable by cash or cheque to Sharon. Participants please bring scissors, paper trimmer, double-sided tape & dimensionals/3D foam tape. To ensure you have a spot register with Sharon before Saturday, directly at sharonmreinhart@yahoo.ca, registration at the crop will be subject to availability.

Tuesday, January 15, 2013

Share a little love!

Thought I would share a little love today with this Valentine themed card. This card would be wonderful as an Anniversary card as well. To begin create an A2 red base card then layer Canvas Corp printed paper to ivory pearl cardstock. The black cardstock flourish has been created with a Tim Holtz die from Sizzix. The adorable bingo card stamp is from Kaisercraft and the extra words, treasure and cherish were also cut from two other bingo card stamps. Finish with a thread wrapped scalloped heart, the thread is a beautiful metallic thread from Wonderfil and the heart was created using the Spellbinder's Nestabilities scalloped heart die. Don't forget the little rhinestone accents! Thread wrapping is easy to complete and offers such beautiful results! If you haven't tried this technique yet I encourage you to. Thread may be simply wrapped through the valley of one scallop and then directly across. Or, to give it a Spirelli look, skip a number of scallops and then continue wrapping until two threads are in each valley. For this heart I started the wrap to the right of center at the top and then continued to the left at center bottom. Keep wrapping in this manner then adhere and trim the thread on the back. If you do not create Valentine or Anniversary cards just switch up the greetings to a different occasion such as Birthday! Hope you like it! Creatively Yours, Sharon

Thursday, January 3, 2013

Card Makeover!

Project Design © Sharon M. Reinhart 2013
One of the things that I would like to improve this year, is to provide you with more inspiration and on a consistent basis. It looks like so far I am on track. Wish me luck!
At this time of year many of us are feeling somewhat creatively drained when it comes to our cardmaking. Rather than struggle with this, look to some of your creations from Christmas and the holidays. To see the Christmas card instructions and supply list, head on over to my November 26 Cardmaker Newsletter using this link. As you can see the design inspiration was taken from the Christmas card and then recreated with different papers and placement of the elements.

Project Design © Sharon M. Reinhart 2013
The accordion rosette on this card has been created using a Tim Holtz die and ivory pearl cardstock. The heart embellishment was simply cut from the printed paper and adhered to a die-cut SpellbindersTM scallop heart shape. Then pretty pink metallic thread, from Wonderfil thread, was wrapped in the valleys of the scallops. To finish the card, a stamped image using Chalk ink was created. Then a final accent using fancy edgers from Fiskars (have not used these in a long while, usually head to my border punches, but think I will pull out my fancy edgers again!)
This is a simple yet effective card and one that with a different sentiment could easily work for a wedding, anniversary, birthday, Valentine's or a baby card. Hope this technique of recycling ideas helps to rev up your creativity again! Start with clean and simple and then if you are ready to kick it up another notch -- go for it!
Till next time I challenge you to give this a try!
Creatively Yours,
Sharon

Monday, December 31, 2012

Delicate Paper Snowflakes

These 26 paper snowflakes were created to honor the staff and students of Sandy Hook school. The PTA had put out a call for snowlfakes so that they could transform the new school that students of Sandy Hook will be attending in January into a Winter Wonderland. I believe they have accomplished their goal, as today when I went to the web site to retrieve the address to ship my snowflakes, they had a new note stating that with regret they had to close this project for further donations of snowflakes as they have been overwhelmed with donations. So, my little snowflakes will be donated instead here at home to a project involving children or schools. So, if you too are like myself, I encourage you to visit this site to find out other ways your snowflakes can be used to honor the community of people at Sandy Hook school and help others. http://www.ctpta.org/SANDY-HOOK-FUND.html

If you wish to create snowflakes like the ones shown above for your own creative projects -- ornaments, tags, gift packaging, or cards.  Here are some brief instructions:
1.  Cut out snowflake of choice by hand or using a punch or cutting system. The snowflakes shown here have been created using a Spellbinder'sTM template.
2.  Next cut a scallop shape, one that has an even number of scallops, this scallop circle is 1 3/8-inches. Tape metallic thread to back, wrap thread through the valley of one scallop, count 7 valleys to the right and wrap thread through this valley. Wrap thread around back of shape and to the right of the first wrap. Continue wrapping in this manner until two threads appear in each valley. Adhere thread to the back and trim. Place an adhesive rhinestone to the center. Adhere to one side of the snowflake. Complete an additional thread wrap scallop and adhere to the opposite side of the snowflake.
3.  Finish the snowflake by applying Stickles glitter glue randomly to the snowflake.

As a new year is quickly approaching I would like to take this time to wish you and yours all the best and may 2013 be filled with good health and happiness. Life is as delicate as snowflakes, and just like snowflakes, each persons life and path is different.  I do hope the common denominator will be kindness and compassion. Have a safe and happy New Year!
Creatively Yours,
Sharon

Monday, November 26, 2012

Christmas Cards & Inspiration!

Project designs ©Sharon M. Reinhart 2012
I would like to invite you to head over to Cardmaker Magazine's most recent newsletter. I am sharing some Christmas card designs as well as how to take inspiration from one design to create other items such as party favors, packaging, ornaments, etc. The newsletter is a free resource that if you sign up will go directly to your inbox every three weeks. Hope you like it!
Creatively Yours,
Sharon

Saturday, October 6, 2012

Christmas Gift Card Holder

Project Design ©Sharon M. Reinhart
Happy World Cardmaking Day!  To celebrate, I have chosen to share this quick and easy gift card holder with you.  Hope you like it!
I have used the following materials: ivory pearl and gold cardstocks, green and brown cardstock, Hero Arts sentiment stamp, Chalk ink olive pastel and chestnut roan, Wonderfil thread, EK Success star punch, Cuttlebug embossing folder, SpellbindersTM Lacey Pennant and Labels One die sets, Standard Circle die or circle punch, scissors, double-sided tape, foam mounting tape, bone folder, die-cutting system.
The base card is created from a 4 x 10-inch piece of cardstock. Score at 3-7/8, 5 and 6-1/8 inches.   Fold in half. Use label die placed partially on center fold approx. 1/4-inch, cut following manufacturer's directions. Apply double-sided tape between the two remaining score lines but not on the edges that have been die-cut, adhere. This area will serve as the gift card holder.  Emboss front cover using embossing folder. 
Die-cut scallop triangle shape using pennant die. Cut a small slit in the valleys between the scallops at the bottom left and right. Working from the spool of thread, tape thread to the back. Carry thread around to the front through one of the previously cut slits. Wrap thread diagonally up one side of the tree (pennant shape), cross at the top and wrap diagonally working down the tree. Finish by wrapping thread through the remaining previously cut slit, secure with tape at the back. Cut a small rectangle from brown cardstock, adhere to the back at center bottom to create the trunk. Punch star and adhere to the top of the tree. Stamp sentiment and punch or die cut. Edge with ink. Adhere sentiment to card using foam mounting tape. Don't forgt to insert desired gift card, money, bookmark, coupon or whatever you want to include.  Stickles glitter glue is a nice finishing touch on some of the embossed designs (not shown in this photo).  Hope you will explore the World Cardmaking Day blog tour, click on the link below.  If you are a new visitor to this blog don't forget to check out the Fabulous Paper Folds online class using the link at the right side!  Thanks for visiting!
Creatively Yours,
Sharon

Friday, April 13, 2012

Always & Forever Wedding Card

Project design ©Sharon M. Reinhart
Sharing another card that we created in the wedding inspiration class. This one combines the ease of pressure embossing using a Cuttlebug embossing folder and thread wrapping techniques. The scalloped hearts were cut using the Spellbinders Nestabilities classic scalloped heart. The beautiful metallic thread is from Wonderfil. The use of embossing folders and die templates on assembly line style cards makes the process a whole lot quicker. The thread wrapping is not difficult at all -- you could put the entire wedding party to work on these, both the guys and the gals! For the thread wrapping be sure to work from the spool of thread if you cut a length of thread it will be tangled in no time. Tape the end of the thread to the back of the scallop shape. Wrap thread around the front just right of center then across the front and between the scallops at the bottom just left of center. Continue wrapping the thread in a clockwise manner until complete. Cut the thread from spool and adhere to back of piece.  Adhere one of the hearts with double sided tape to the card front and the other with foam mounting tape - two of my favorites are the Scotch foam mounting squares and the Tombow power tabs. I find that both of these products allow for my designs to have dimension but usually do not interfere with the mailing process. This card is a great style for a wedding invitation, shower invitation or an anniversary. Enjoy!
Creatiely Yours,
Sharon

Wednesday, February 8, 2012

Same Supplies three Valentines Cards!

I wanted to invite you to come on over to CardMakers online newsletter where I am sharing info on creating these three valentines from the same set of supplies. This is a great way to kick start the creative process. Choose a set of supplies and by changing the orientation, color layers, and placement of images, see how many different designs you can come up with. I know with life on fast forward at times we all need a method to create our greetings quickly and in an orderly fashion. I often have a difficult time with assembly line cards because I like to change it up, this method allows me to do that but also keeps my creative wanderings under control so that I may complete more cards in less time. So give it a try and head over to CardMaker magazine online newsletter February 6th issue for the how to on the cards shown in this post.
Creatively Yours,
Sharon
Wednesday, January 11, 2012

Valentine's Inspiration!

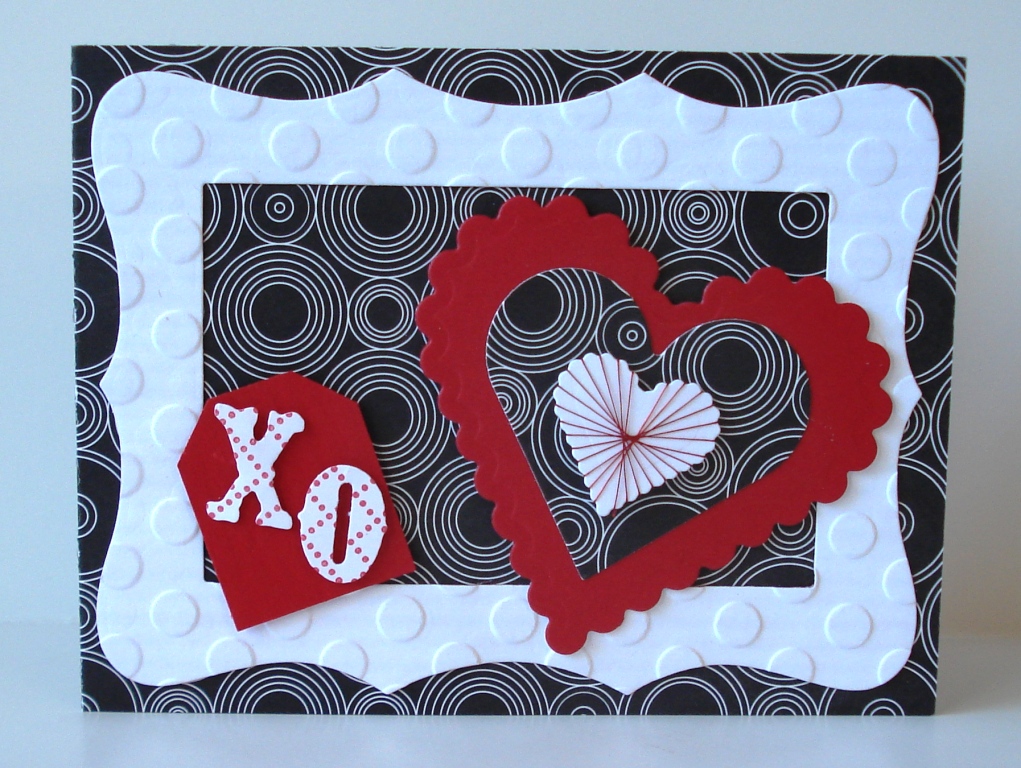
Well we are just a bit over a month from Valentine's day, before you know it the day will have come and gone. So, now is the time to create your Valentine's. This particular card would be perfect for the guys or the gals, because of the colors and the different patterns it retains a strong look. I am sure the guys will not mind the little bit of beautiful metallic thread that adorns the smallest heart. I think the thread gives this card a bit of a pop. Try stamping a pattern onto the die cut letters (Tim Holtz Vintage Market die) it helps to make the x and the o pop as well. I love all of the different patterns in this card.  The die cut hearts and frame are from Spellbinder's. I wanted a larger polka dot on the frame so I embossed it in an embossing folder. Hope this card inspires you to start creating!
Creatively Yours,
Sharon
Blog Hop Button January Blog Hop: Love is In the Air + Giveaway!

Sunday, October 16, 2011

Thread Wrapped Card

Card design ©Sharon M. Reinhart 2011
I must say that I truly love beautiful threads, fibres and fabric but I do not sew. So instead I use these beautiful products within my card and papercrating projects. This thread wrap is a Spirelli technique using Wonderfil metallic threads on Spellbinder's pinking circles dies. I love the effect! The metallic bar at the bottom was colored with a copper leafing pen and then lightly sanded to reveal the word joy in silver. If you love thread wrapping, check out my article That's A Wrap at Cardmaker's on line newsletter.  Enjoy!
Creatively Yours,
Sharon
