I would like to invite you to take a look at my most recent CardMaker newsletter - it's about Tea-Bag Folding! These three cards were created using tea-bag folding techniques. The top left card makes use of punched or die cut circles, the top right card is created by using a rubber stamp to create the papers and the bottom left card makes use of printed squares of paper folded and then layered onto a border punched square. If you are interested in further designs please check out my book Tea Bag Folding Through the Seasons.
Here is a little design tip for varying sentiment images. Simply pierce through the word to give a stitching effect. I use a foam mouse pad for my piercing pad and I really like the Tonic retractable piercing tool.
Creatively Yours,
Sharon
Monday, March 26, 2012
Thursday, March 15, 2012
Happy Birthday Card
![]() |
| Project Design ©Sharon M. Reinhart 2012 |
Creatively Yours,
Sharon
Tuesday, March 6, 2012
Delicate Layers & Tea Bag Fold Card
I think the amount of snow we received the past couple days was the inspiration for this card. The snow glistens as if it has been dusted by glitter thus the glitter on this piece. The layers are like the layers of snow we now have and the finished piece could resemble a snowflake as well. This card is created by using the Fleur De Lis Pendant die by SpellbindersTM, however any pendant die would work. Then the final part is a tea-bag fold creation in the center followed by a pretty pink brad. A couple of sparkling rhinestones can also be found here and there. To build the layers just use a dimensional tape in between, I do like to use the foam mounting tape or squares by 3M. The tea-bag folded rosette was created using a basic fold with circle shapes and then progressing on with a final fold back of the top layer. The basic fold is to fold the circle in half and then again into quarters. Unfold all, re-crease on both lines so very pliable. Holding the circle with the folds in an x shape, push center pieces under and into center to collapse into a pie shape. Fold back top layer aligning with edges (refer to photo). You need 8 pieces to create one rosette. Then assemble by placing a small piece of tape on the back on one side (stay consistent to the same side), sandwiching one piece between the other. My favorite tape to use for this is the 1/8" wide Scor-tape. For more tea-bag folding projects and instructions please check out my book Tea Bag Folding Through the Seasons.
Creatively Yours,
Sharon
Creatively Yours,
Sharon
Thursday, March 1, 2012
Paper Flower Favor
A quick post today to share one of my most favorite dies. It's the Spellbinders TM Shapeabilities® Anemone die set! This project was originally for Valentine's Day but it would also make a wonderful wedding or shower favor. It started with a silver tin that was dry brushed with white acrylic paint. Then two layers of the same size Anemone die followed by the petal style die (in the same set) and then the final layer a stamped letter. Be sure to curl the flower petals gently using a bone folder or wooden skewer. Hope you like it!
Creatively Yours,
Sharon
![]() |
| Project Design ©Sharon M. Reinhart 2012 |
Creatively Yours,
Sharon
Labels:
anemone,
favor,
paper flower,
Spellbinders
Monday, February 27, 2012
Butterfly Wishes All Occasion Card
![]() |
| ©Sharon M. Reinhart 2012 |
To get back in to action here I have chosen to share a card that was inspired by the paper itself. This beautiful paper from Pink Paislee inspired the use of the Beautiful Wings Embosslits from Stampin Up and the Tim Holtz dress form die from Sizzix. The Cuttlebug Swiss Dots embossing folder by Provocraft added a beautiful texture to the dress form as well as mimicked the pattern in the paper layered beneath. The beautiful rhinestone flourishes that are so popular were the perfect compliment to the neckline on the dress form as well as for use on the butterflies. White crepe paper slightly gathered became the skirt along with a paper waistband complete with a butterfly embellishment. I purposely did not include a sentiment on the front of this card as I felt that it could be used for a variety of occasions and I wanted the design on the front to be the focus. Once chosen for a specific occasion I will include the sentiment on the inside.
Hope you like this project!
Creatively Yours,
Sharon
Wednesday, February 8, 2012
Same Supplies three Valentines Cards!
I wanted to invite you to come on over to CardMakers online newsletter where I am sharing info on creating these three valentines from the same set of supplies. This is a great way to kick start the creative process. Choose a set of supplies and by changing the orientation, color layers, and placement of images, see how many different designs you can come up with. I know with life on fast forward at times we all need a method to create our greetings quickly and in an orderly fashion. I often have a difficult time with assembly line cards because I like to change it up, this method allows me to do that but also keeps my creative wanderings under control so that I may complete more cards in less time. So give it a try and head over to CardMaker magazine online newsletter February 6th issue for the how to on the cards shown in this post.
Creatively Yours,
Sharon
Creatively Yours,
Sharon
Friday, February 3, 2012
Back from CHA!
For those of you who are not familiar with CHA it stands for the Craft and Hobby Association. Twice yearly, Winter and Summer a huge trade show and conference is held. This winter the show returned to Anaheim, my favorite location. There is always a buzz around these shows, partly due to all of the new product launches but also the wonderful demonstrations, classes and displays that can be found. It truly is a creative feast. so my apologies for being MIA, I was madly preparing my designer showcase for CHA and then attending the show.
One of my favorite demonstrations was by Dyan Reaveley a signature designer with Ranger. Her line with ranger is called Dylusions and it includes, spray inks, stamps and stencils. Art journaling has become very popular and Dyan makes it look so easy. Within minutes she created beautiful layers and textures in her moleskin art journal, however she says she uses any type of paper. Her demo was interesting, inspiring, educational and fun! Thanks Dyan, I have been inspired to create! Until next time I hope your adventures are creative as well! Creatively yours, Sharon.
![]() |
| Dyan Reavely - Ranger CHA |
![]() |
| Dyan Reaveley journal page in progress |
Friday, January 20, 2012
More Valentine's!
Sharing this cute little card which was an early Valentine treat for the ladies at my Make and Take/Book Signing at Scrapbooker's Paradise north store yesterday. What a wonderful group of ladies both the participants and the staff! Although we did not create this card, the instructions were made available to the Toonie Thursday participants through the cooperative effort of Scrapbookers Paradise north store manager, Angela, and myself. All of the supplies are available at Scrapbooker's Paradise so go visit Angela and let her know that Sharon sent you.
Creatively yours,
Sharon
![]() |
| ©Sharon M. Reinhart 2012 |
Creatively yours,
Sharon
Wednesday, January 11, 2012
Valentine's Inspiration!
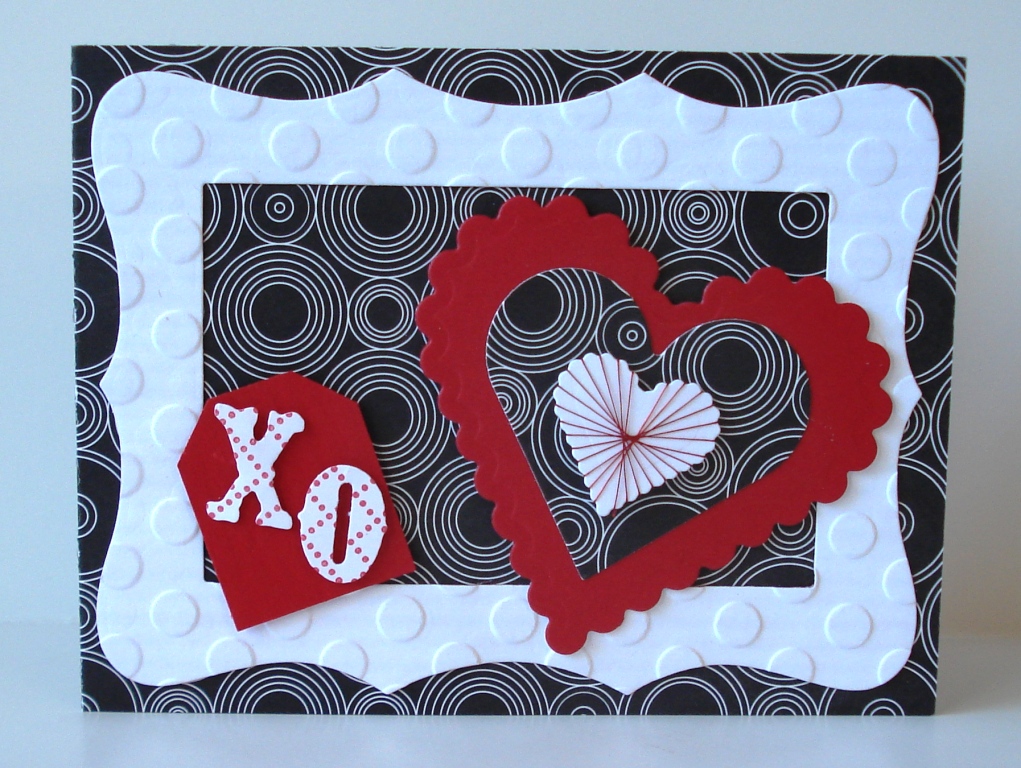
Well we are just a bit over a month from Valentine's day, before you know it the day will have come and gone. So, now is the time to create your Valentine's. This particular card would be perfect for the guys or the gals, because of the colors and the different patterns it retains a strong look. I am sure the guys will not mind the little bit of beautiful metallic thread that adorns the smallest heart. I think the thread gives this card a bit of a pop. Try stamping a pattern onto the die cut letters (Tim Holtz Vintage Market die) it helps to make the x and the o pop as well. I love all of the different patterns in this card. The die cut hearts and frame are from Spellbinder's. I wanted a larger polka dot on the frame so I embossed it in an embossing folder. Hope this card inspires you to start creating!
Creatively Yours,
Sharon
Creatively Yours,
Sharon
Labels:
handmade cards,
hearts,
Spellbinders,
thread wrapping,
Tim Holtz,
valentines card,
Wonderfil
Tuesday, January 10, 2012
Valentine Make & Take!
![]() |
| ©Sharon M. Reinhart |
Hope to see you!
Creatively Yours,
Sharon
Friday, December 30, 2011
Friends Greeting Card
![]() |
| ©Sharon M. Reinhart 2011 |
Until next year take care!
Creatively yours,
Sharon
Labels:
border punches,
Cardmaker Magazine,
handmade cards,
seed beads
Tuesday, December 27, 2011
Celebrations!
![]() |
| ©Sharon M. Reinhart 2011 |
As a new year approaches I would like to thank each of you who has touched my life in various ways throughout this past year! I truly appreciate the support given to me through attending my classes, book signings and the purchase of my books. I also appreciate the stores who have stocked and promoted my publications, two of the local ones are Paper Pastimes and Scrapbooker's Paradise - heartfelt thanks! I encourage you to visit these local stores (Calgary, Alberta), I am sure you will be pleased with what they have to offer! I enjoy reading the feedback from readers of the CardMaker Magazine online newsletter -- keep your thoughts coming! I look forward to helping to inspire you to create in the coming year.
If you are looking for some inspiration on border punches please check out my most recent edition of the CardMaker online newsletter. In case you are not familiar with this newsletter I am co-editor along with Kimber McGray. It is a free newsletter that you can sign up for and then it comes directly to your inbox. My most recent issue went out on December 26th and it is about using border punches. So please check it out -- CardMaker Newsletter. The card shown in this post is one that is shared in the newsletter. Hope you enjoy it!
Creatively Yours,
Sharon
Saturday, December 24, 2011
Merry Christmas!
![]() |
| ©Sharon M. Reinhart 2011 |
May each of you experience the joy of this season and be wrapped in warm moments spent with family and friends!
Sharon
Labels:
canvas wall art,
christmas,
home decor canvas,
tea bag folding
Monday, December 12, 2011
Gift Card Holder
As promised, here is the inside view of the greeting card posted yesterday. To create the base card simply cut cardstock 5 1/2" x 11", score at 4 1/4", 5 1/2" and 6 3/4". Fold on the 5 1/2" score line and use a label die or die/punch of choice to cut an opening on the fold for the gift card. To finish, fold on the remaining score lines creating the 4 1/4" x 5 1/2" card. Adhere, sandwiching middle panel on inside of card. Narrow double-sided tape such as the 1/8" Sookwang tape works perfectly, allowing enough space for the gift card itself. I have often used these style of cards for movie passes as well, the type that you can get at Costco - I just fold them and insert. They would work equally as well for a monetary gift. Hope this helps with your gift giving!
Creatively yours,
Sharon
Creatively yours,
Sharon
Sunday, December 11, 2011
Ivory Snowflake Christmas Card
![]() |
| Design ©Sharon M. Reinhart 2011 |
I wanted to send my sincere thanks to all of the staff at Scrapbooker's Paradise north store for their assistance with yesterday's make and take and booksigning! It was a great event and I met some wonderful ladies who I believe have now caught the tea-bag folding bug!
Creatively Yours,
Sharon
Labels:
christmas card,
gift card holder,
snowflakes
Monday, December 5, 2011
Christmas Card Make & Take!
Hope those of you that are in the Calgary area will join me at Scrapbooker's Paradise North store (Crowfoot Crossing - 45 Crowfoot Terrace NW) for a greeting card make and take and booksigning on Saturday December 10th from 11 am to 3 pm. The cost for the make and take is $2.00 and it is a Christmas themed greeting card using tea bag folding techniques, beautiful die-cuts from Spellbinder's and great texture created with a pretty Sizzix embossing folder.
In case you have not heard about tea bag folding it began in Holland with a lady named Tiny Van Der Plaas who used a pretty tea bag envelope to fold into shapes to create a card. In North America we do not have the pretty printed envelopes but we certainly do have lots of other pretty papers! I will have some of the original card samples from my books Tea Bag Folding Through The Seasons and Iris Folding For Christmas on display as well. I hope to see you!
Creatively Yours,
Sharon
In case you have not heard about tea bag folding it began in Holland with a lady named Tiny Van Der Plaas who used a pretty tea bag envelope to fold into shapes to create a card. In North America we do not have the pretty printed envelopes but we certainly do have lots of other pretty papers! I will have some of the original card samples from my books Tea Bag Folding Through The Seasons and Iris Folding For Christmas on display as well. I hope to see you!Creatively Yours,
Sharon
Sunday, December 4, 2011
Christmas Card & Gift Set
This ensemble (the card was posted previously) is a perfect way to extend your appreciation to those people who make a difference in your life. Possibly you have a snow angel - a wonderful person who shovels your walk just because, or a teacher/coach who goes above and beyond and as a result has made a difference in you or your child's life. Or for a hostess who has opened her home to you and made you feel welcome. We all or I hope we do, I know I am blessed to have many people that make a difference in my life. So put your papercrafting supplies and skills to good use. This ensemble makes use of a purchased journal and door hanger. For more ideas head to CardMaker Magazine's online newsletter, the November issue is all about tokens of appreciation. I hope you enjoy!
Creatively Yours,
Sharon
Creatively Yours,
Sharon
Labels:
christmas card,
gifts,
tokens of appreciation
Sunday, November 27, 2011
Quickie Christmas Card
![]() |
| Design ©Sharon M. Reinhart 2011 |
This card utilizes a rub on transfer for the sentiment a die cut frame, tag and ornament shape, a splash of ribbon and of course a little sparkle with Stickles. Hope it helps for those of you who may be like me, way behind. Oh well, it always comes together, so don't forget to take time and enjoy your preparations.
Creatively Yours,
Sharon
Friday, November 18, 2011
Sparkling Flake Christmas Card
![]() |
| Design ©Sharon M. Reinhart 2011 |
I would like to invite anybody in the Calgary area to a craft fair that I am participating in on Saturday November 19th from 10 am to 3 pm. The location is the Edgemont Community Center 33 Edgevalley Circle N.W. Calgary, Alberta. I will have some handmade creations for sale along with my books Iris Folding for Christmas and Tea Bag Folding Through The Seasons. I will happily sign any books purchased. Hope to see you, I hear there are some wonderful vendors at this event! Purchases will be on a cash only basis.
Creatively Yours,
Sharon
Sunday, November 13, 2011
Snowflake Tea-Bag Fold Card
![]() |
| Design ©Sharon M. Reinhart November 2011 |
Creatively Yours,
Sharon
Labels:
christmas card,
rubber stamping,
snowflake,
tea-bag folding
Friday, November 11, 2011
Thursday, November 3, 2011
Christmas Iris Fold Card
![]() |
| Design ©Sharon M. Reinhart November 2011 |
Hope this card inspires you to create!
Creatively Yours,
Sharon
Saturday, October 29, 2011
Gift Card Holder
![]() |
| Project Design ©Sharon M. Reinhart 2011 |
As the holidays are quickly approaching and because I have not had an opportunity to do much in the creative arena lately I thought I would share this quick gift card holder that I featured in a CardMaker e-letter about gift card holders. Be sure to check out the article for more ideas and inspiration.
This particular project makes use of an RSVP envelope sealed and cut to size to create the pocket. Add some decorative papers, stamp a greeting (this one is from Hero Arts), and layer onto a pretty die-cut lacey circle (Spellbinder's). Add some ribbon and an adhesive pearl, finish by layering onto cardstock or a card and of course remember to insert the gift card of your choice.
Hope you like it!
Creatively Yours,
Sharon
Sunday, October 16, 2011
Thread Wrapped Card
![]() |
| Card design ©Sharon M. Reinhart 2011 |
Creatively Yours,
Sharon
Labels:
All occasion card,
spirelli,
thread wrapping
Wednesday, October 12, 2011
Tea Bag Folding Class
![]() |
| Class designed for Scrapbooker's Bliss ©Sharon M. Reinhart 2011 |
Creatively Yours,
Sharon
Monday, October 10, 2011
Quick Change Christmas Card!
![]() |
| Design © Sharon M. Reinhart 2011 |
As promised, here is the leaves card from my last post transformed into a Christmas Card! A few rhinestone berries, gold foliage puched using a Martha Stewart punch, a bit of red ribbon and a splash of red cardstock and voila!. Quick Change Christmas Card! This little exercise was done to encourage you to multipurpose your designs, its like a personal challenge and definitely helps kick start the creative process -- hope your like it and give it a try!
Creatively yours,
Sharon
Saturday, October 8, 2011
Quick Any Occasion Card
This simple card is an example of using what you have on hand. If you do not have co-ordinating brads - make your own. Simply apply a strong double sided liner tape to the brad and trim excess. Place a square of printed card stock onto exposed adhesive (it's good to start with a slightly larger square), trim excess cardstock. To give the designer brad an epoxy or lacquer effect apply Glossy Accents or similar clear dimensional medium and let dry. The die cut leaves (Sizzix die) have a thin coat of the dimensional medium as well. The decorative mat is created using a Spellbinder's die. Now you can co-ordinate your brads to any card! The space at the bottom right corner would be perfect for a small greeting like the words thanks, thankful or grateful. On that note, as this weekend is the Canadian Thanksgiving I would like to extend my best wishes to all of you celebrating Thanksgiving, may you share some warm and wonderful moments with family and friends. I know I will be counting my blessings I hope you will too! Be sure to watch for my next post where this design will be transformed into a Christmas Card!
Creatively Yours,
Sharon
![]() |
| Card Design © Sharon M. Reinhart 2011 |
Creatively Yours,
Sharon
Labels:
All occasion card,
Sizzix,
Spellbinders
Tuesday, October 4, 2011
Congratulations! Greeting Card
![]() |
| Design ©Sharon M. Reinhart 2011 |
Creatively Yours,
Sharon
Thursday, September 29, 2011
Creating Cards with Stencils
Just want to give you a sneak peek at what is coming up in my next CardMaker Magazine online newsletter. Its about creating cards using stencils! If you have not signed up for this free newsletter head on over to CardMaker now, once there, scroll down and you will find the free sign up at the bottom left. My next issue goes live on Monday October 3rd, so that means if you sign up now it will go straight to your in box. While you are there be sure to check out the archives. Kimber McGray and myself are the editors for this newsletter, hope you enjoy!
Creatively Yours,
Sharon
Creatively Yours,
Sharon
Monday, September 26, 2011
Christmas Card Class
Please excuse this photo - I grabbed a quick one before the cards were put on display, unfortunately they were already in the protective envelopes and the original cards are on display at Scrapbooker's Bliss. I think it gives you a good idea though on the type of cards we will be creating at my upcoming classes at Scrapbooker's Bliss. There are three dates to choose from Monday evening October 3rd, Wednesday daytime October 5th and Saturday daytime October 15th. Give Bliss a call at 403-217-9827 for further information. We had these cards on display at the Scrapbooker's Bliss booth this past weekend at the Great Canadian Scrapbooking Carnival put on by Canadian Scrapbooker and they were well received. It was great to see so many of you that I have had the pleasure of meeting previously in my classes and at other paper-crafting events and also to meet so many new people that our paths have not previously crossed. Hope you all had a great weekend! If you want to learn how to do tea bag folding or you just want some more ideas for Christmas cards, this is the class for you. By the way, the cards are hanging from a pant hanger, great way to hang scrapbook pages, cards, etc.
Creatively Yours,
Sharon
Creatively Yours,
Sharon
Thursday, September 22, 2011
The Great Canadian Scrapbook Carnival!
Don't forget to come by and see us at Scrapbooker's Bliss at MacEwan Hall University of Calgary! Parking lots may be accessed easily from the 32nd Avenue entrance.
Thursday, September 15, 2011
Halloween Card
![]() |
| Design ©Sharon M. Reinhart 2011 |
Hope you like it!
Creatively Yours,
Sharon
Labels:
beads,
halloween,
invitation,
Spellbinder's
Lot's of Inspiration & Shopping!
Just want to invite you to participate in the Great Canadian Scrapbook Carnival organized by Canadian Scrapbooker Magazine. This event is a wonderful opportunity to crop, take classes, gain inspiration, have fun and of course shop! This years event is being held at MacEwan Conference & Events Centre on the U of C Campus, 402 Collegiate Boulevard N.W. on Friday, September 23rd from noon to 9 pm and Saturday September 24th from 9 am to 5 pm.
I will be doing a booksigning and demonstration of some of the techniques in my most recent book Tea Bag Folding Through The Seasons as well as demonstrations of a variety of other products and techniques. So please come by and see me at the Scrapbooker's Bliss booth on Saturday between 10:30 to 12:30 and 1:30 to 3:30. Hope to see you!
Creatively Yours,
Sharon
I will be doing a booksigning and demonstration of some of the techniques in my most recent book Tea Bag Folding Through The Seasons as well as demonstrations of a variety of other products and techniques. So please come by and see me at the Scrapbooker's Bliss booth on Saturday between 10:30 to 12:30 and 1:30 to 3:30. Hope to see you!
Creatively Yours,
Sharon
Tuesday, September 6, 2011
Christmas Tea Bag Fold Card
![]() |
| Design ©Sharon M. Reinhart 2011 |
![]() |
| Design © Sharon M. Reinhart 2011 |
Creatively Yours,
Sharon
Sunday, September 4, 2011
Tea Bag Folded Card
![]() |
| Design ©Sharon M. Reinhart 2011 |
This tea bag fold is a non traditional design as it uses circle shapes rather than the traditional square shapes. It is an easy one to create and can be used for many applications. Hope you like it!
Creatively Yours,
Sharon
Thursday, September 1, 2011
More Card Inspiration & Techniques!
Hi All! Just wanted to share some info on a new special interest publication from CardMaker Magazine that is set to hit the newstands and Annie's Attic soon. This 114 page publication is packed with a variety of cardmaking techniques by various designers. I am thrilled to see one of my own projects on the cover - "Thanks" Spotlight Technique bottom left. Can't wait to get my copy!
Creatively Yours,
Sharon
Creatively Yours,
Sharon
Friday, August 26, 2011
Artist Trading Cards
![]() |
| Design ©Sharon M. Reinhart 2011 |
Creatively yours,
Sharon
Monday, August 22, 2011
Tea Bag Fold Card
![]() |
| Design ©Sharon M. Reinhart 2011 |
This card was finished by layering the folded medallion onto printed script style paper and then a layer of the gold paper. The greeting is a Stampin' Up greeting and then simply punched out. This is a card that could be used for multiple reasons and seasons, perhaps even a Christmas greeting. Watch for Christmas inspiration coming soon! Hope you like the simplicity of this card.
Creatively yours,
Sharon
Monday, August 15, 2011
From Card to Home Decor!
![]() |
| Design ©Sharon M. Reinhart 2011 |
Creatively yours,
Sharon
Saturday, August 13, 2011
Stamped card with Background Technique
![]() |
| Card Design © Sharon M. Reinhart |
Creatively yours,
Sharon
Labels:
backgrounds,
flowers,
handmade cards,
rubber stamping
Monday, August 8, 2011
Happy Birthday Card
Happy Birthday to all of you born on 8/8 and those born on 8/8/88 like my youngest daughter for whom this card was created. Yes, back to handmade flowers, (cannot get enough of them) however using a different die. This time I used the pinked circles die from Spellbinder's, it worked beautifully, creating a carnation style flower. The leaves are from ProvoCraft - love them, I think this one had three different dies in the set. The border was created with a Fiskars border punch.
Quick post today - some simple inspiration!
Enjoy!
Creatively yours,
Sharon
![]() |
| Design ©Sharon M. Reinhart 2011 |
Quick post today - some simple inspiration!
Enjoy!
Creatively yours,
Sharon
Labels:
birthday card,
border punch,
handmade flowers
Thursday, August 4, 2011
Elegant Wedding Congrats Card!
It is that time of year where many of us find ourselves in need of wedding or shower cards. I have chosen to share this one as it is quick and easy and utilizes an inexpensive object found at a dollar store. Which object do you think that is? You may have guessed it, the wire heart. But do you know what its intended purpose is? It along with its partner used to be earrings. Yes, I could have wire wrapped my own piece and usually do make alot of my embellishments by hand, but this time it really was more feasible to use this embellishment. Just remove the earring wire and insert a crystal brad. Of course the beautiful papers in this card also add to the elegance. The base card is charcoal shimmer card stock. The congrats was die cut and adhered to the card then the card front was embossed using an embossing folder. Beautiful printed chiyogami papers from the Japanese Paper Place were used on a square of coaster board for added dimension, then the embellishment was layered on top. To finish the design the panel was then layered onto a die cut label from Spellbinder's. I love the color pallette in this card and the Chiyogami paper - so much so that I used this color combination and papers to create a tea bag folded design in my most recent book Tea Bag Folding Through The Seasons, just click on the photo at the top right for access to view some of the designs in this book. If you are in the Calgary area, Paper Pastimes carries a wide variety of beautiful Chiyogami papers that I am sure you will love! Hope you like this card!
Creatively yours,
Sharon
Creatively yours,
Sharon
Labels:
chiyogami paper,
congrats,
embellishment,
embossed,
handmade cards,
paper-crafting,
wedding
Tuesday, August 2, 2011
Stamping Inspiration!
I was sorting through some things and came across this card from my past. I remember making this card for a class and I just loved how it turned out. When I first started making cards I started as a rubber stamping enthusiast, I still have a love for rubber stamping but for many other techniques and mediums as well. This particular card utilized vellum, chiyogami paper, pearl paper, threads and of course a rubber stamp. The image was stamped on vellum with permanent ink (Memories Artprint Brown) and then stamped again on pearl card stock and heat embossed with gold. The color of the cardstock on the embossed image was removed in specific areas by painting bleach onto the surface. The image was trimmed around and adhered onto the scroll using foam mounting tape. Paper beads made with the same Chiyogami paper that is layered on the card, adorn the edges of a wooden skewer at top left and right and another bead with threads at the center bottom. The reason I am sharing this card with you is that it was one of my favorites but also because some techniques and cards are timeless. It can also be a useful tool to revisit some of the techniques you have used in the past especially if you are in need of some inspiration. Hope this card inspires you to create!
Creatively yours,
Sharon
Creatively yours,
Sharon
Labels:
handmade cards,
paper crafting,
rubber stamping
Subscribe to:
Posts (Atom)